How to Sign in and Withdraw from Bitget

How to Sign in to your Bitget Account
How to Sign in to Bitget
How to Sign in to Bitget using Email or Phone Number
I will show you how to login to Bitget and start trading in a few simple steps.Step 1: Register for a Bitget account
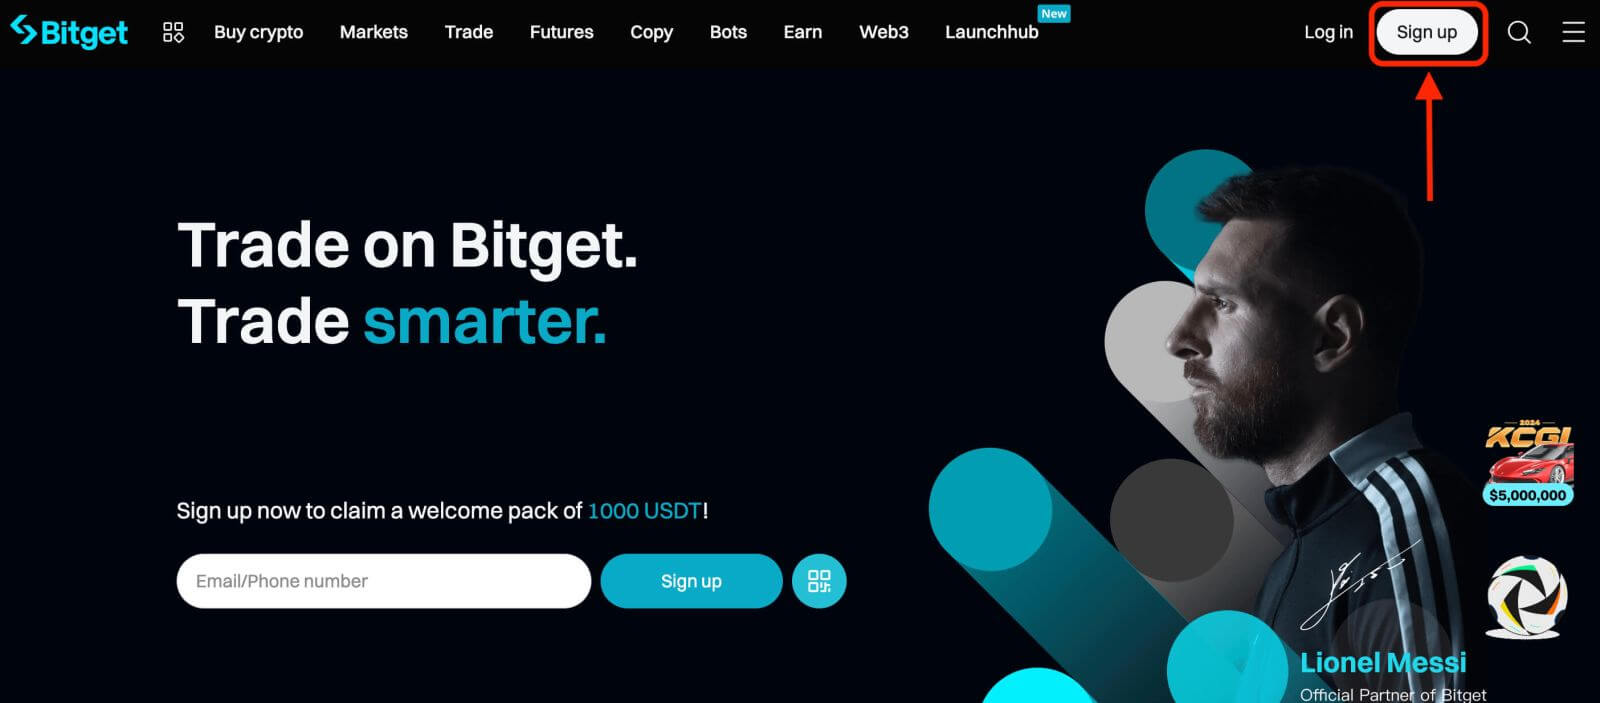
To begin, you can login to Bitget, you need to register for a free account. You can do this by visiting the website of Bitget and clicking on "Sign up".
Step 2: Login to your account
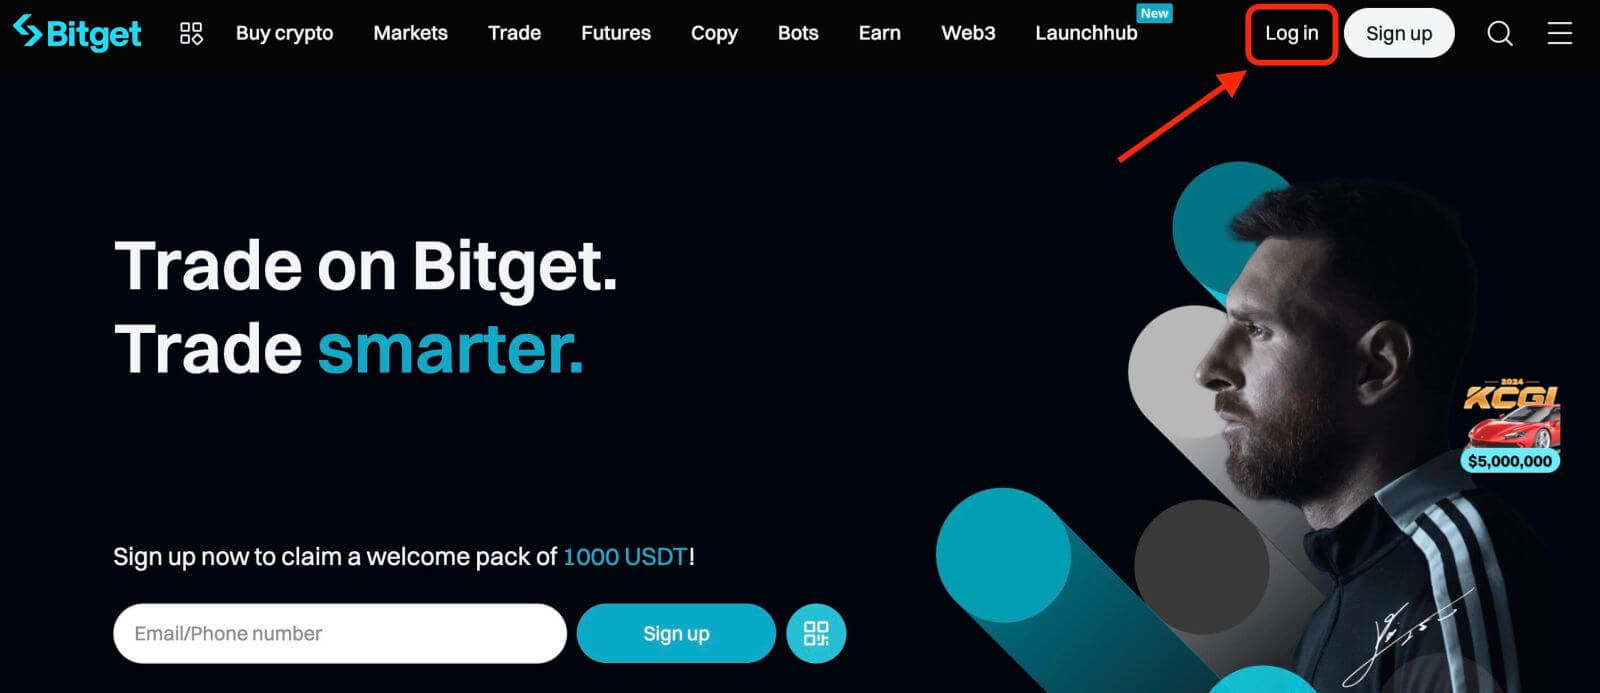
Once you have registered for an account, you can login to Bitget by clicking on "Log in" button. It is typically located in the upper right-hand corner of the webpage.
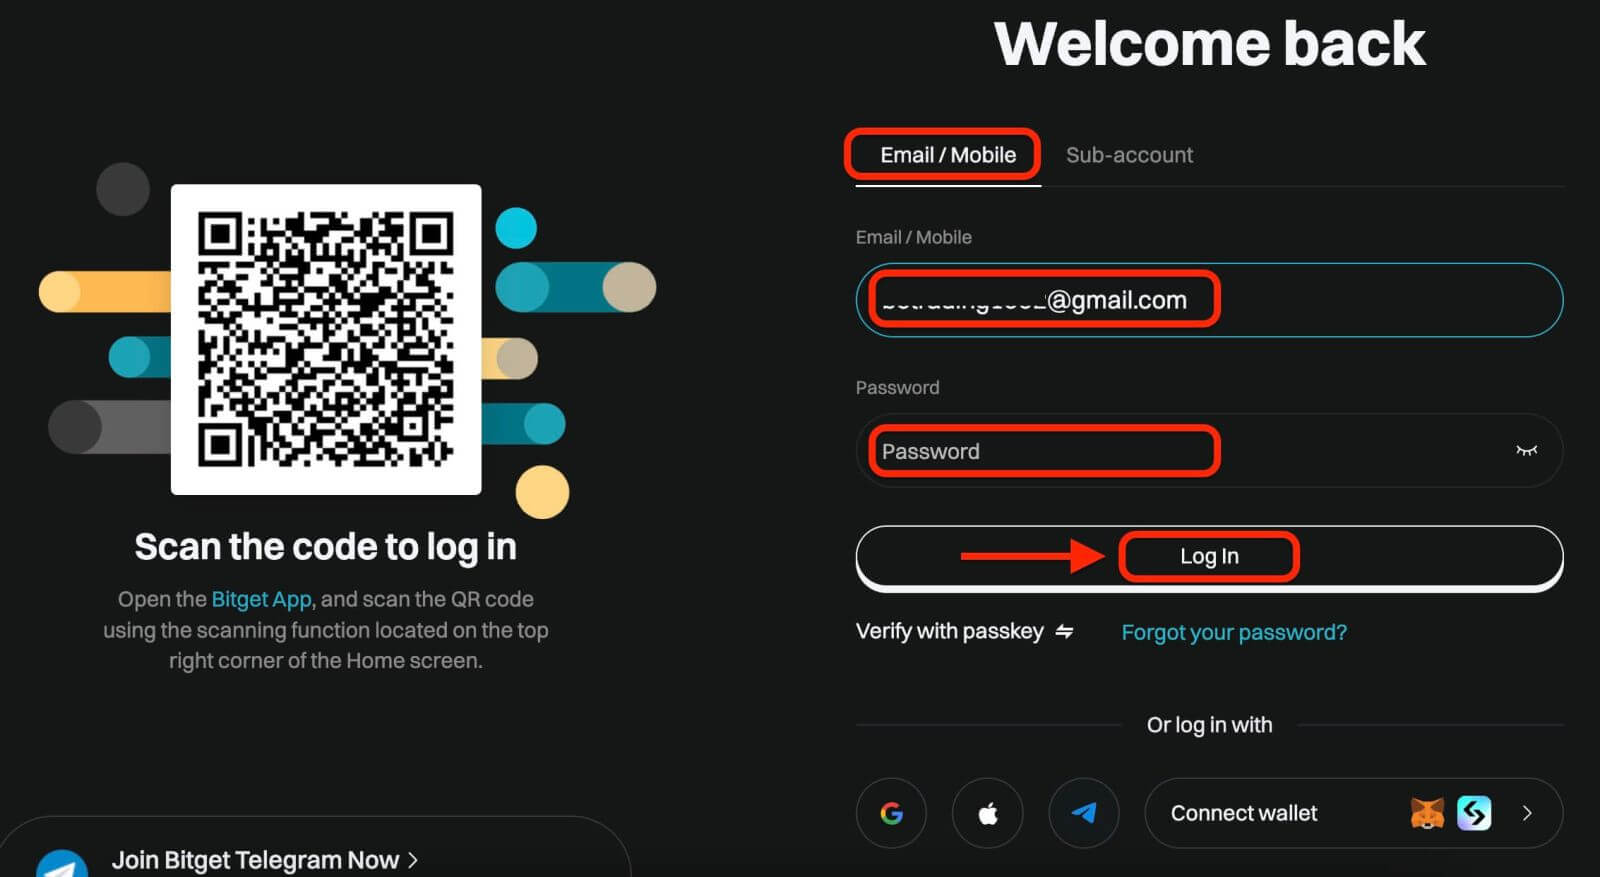
A login form will appear. You will be prompted to enter your login credentials, which include your registered email address or phone number and password. Ensure that you enter this information accurately.
Step 3: Complete the puzzle and enter the digit email verification code
As an additional security measure, you may be required to complete a puzzle challenge. This is to confirm that you are a human user and not a bot. Follow the on-screen instructions to complete the puzzle.
Step 4: Start trading
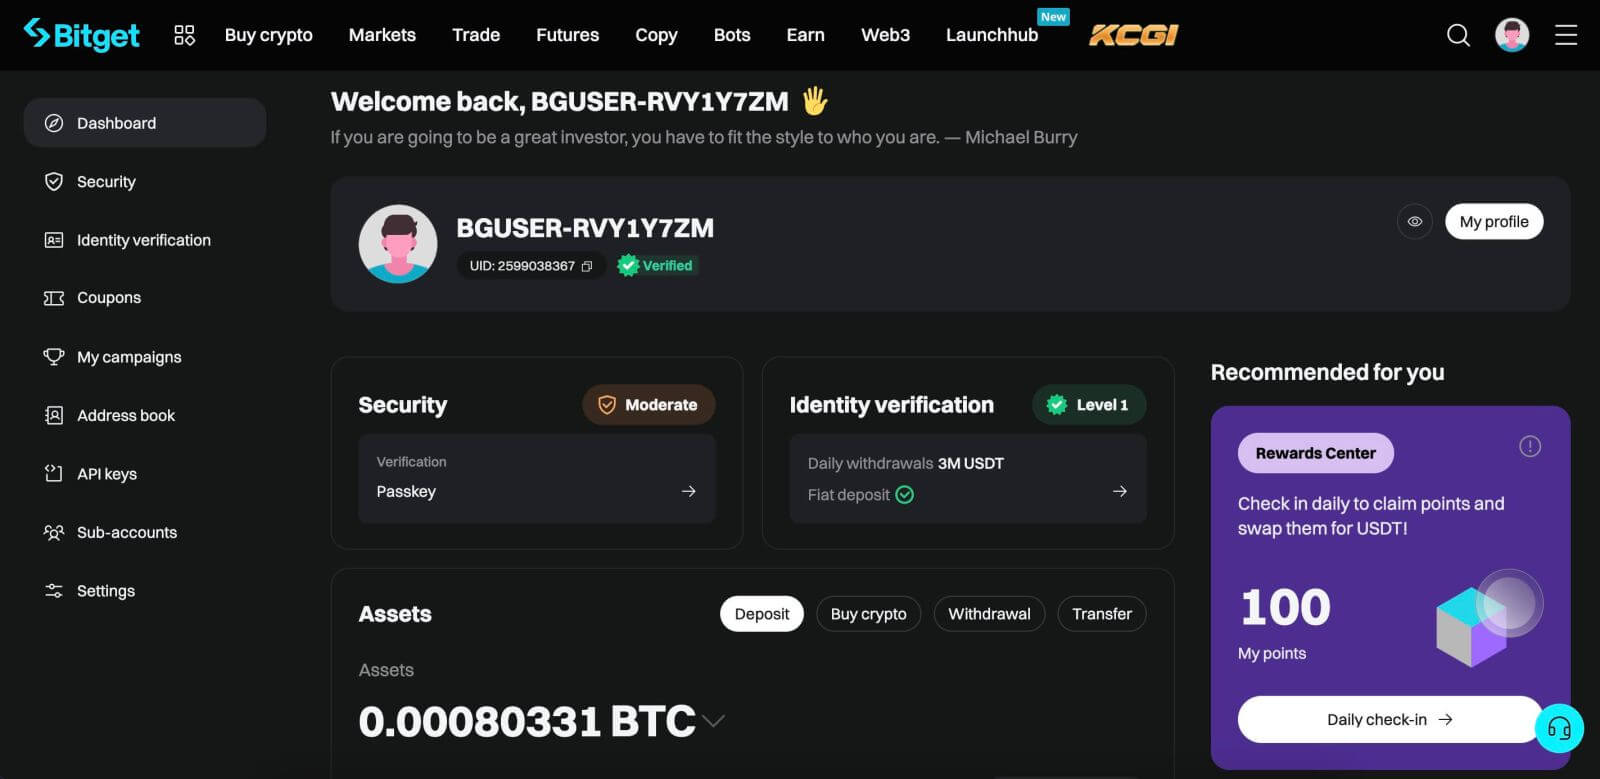
Congratulations! You have successfully logged in to Bitget with your Bitget account and you will see your dashboard with various features and tools.
How to Sign in to Bitget using Google, Apple, MetaMask, or Telegram
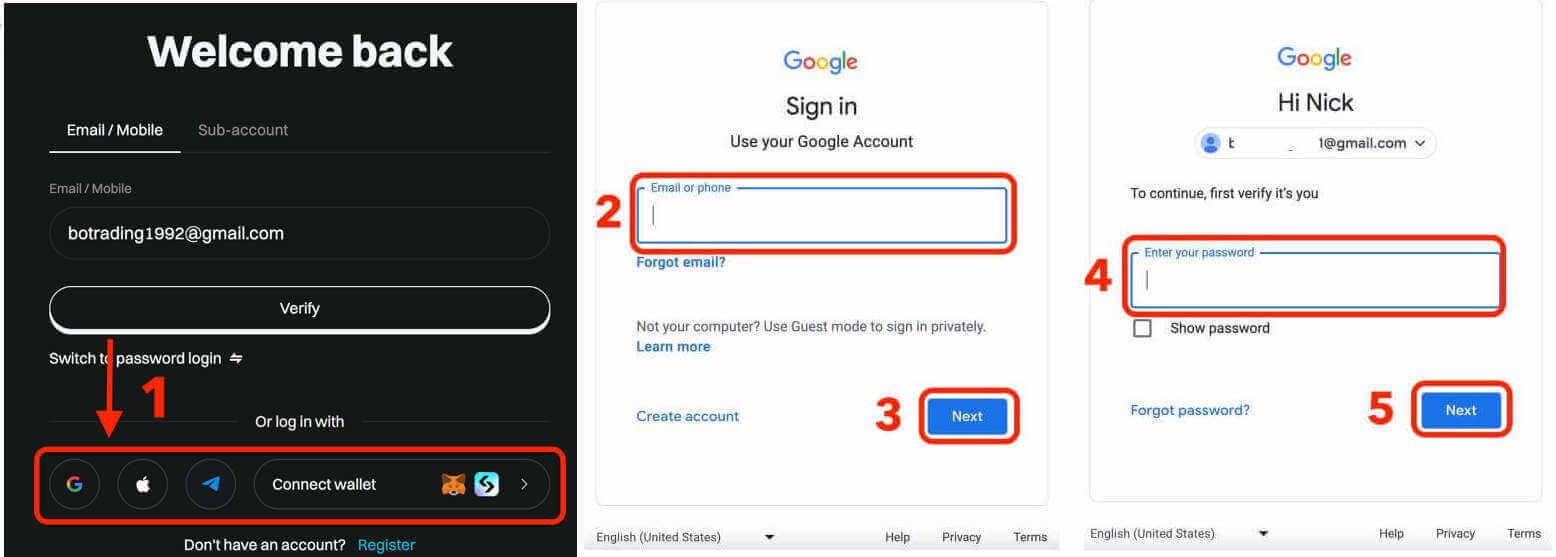
Bitget offers the convenience of logging in using your social media account, streamlining the login process and providing an alternative to traditional email-based logins.- We are using a Google account as an example. Click [Google] on the sign-in page.
- If you are not already logged in to your Google account on your web browser, you will be redirected to the Google sign-in page.
- Enter your Google account credentials (email address and password) to log in.
- Grant Bitget the necessary permissions to access your Google account information, if prompted.
- After a successful login with your Google account, you will be granted access to your Bitget account.
How to Sign in to the Bitget app
Bitget also offers a mobile app that allows you to access your account and trade on the go. The Bitget app offers several key features that make it popular among traders.Step 1: Download the Bitget app for free from the Google Play Store or App Store and install it on your device.
Step 2: After downloading the Bitget App, open the app.
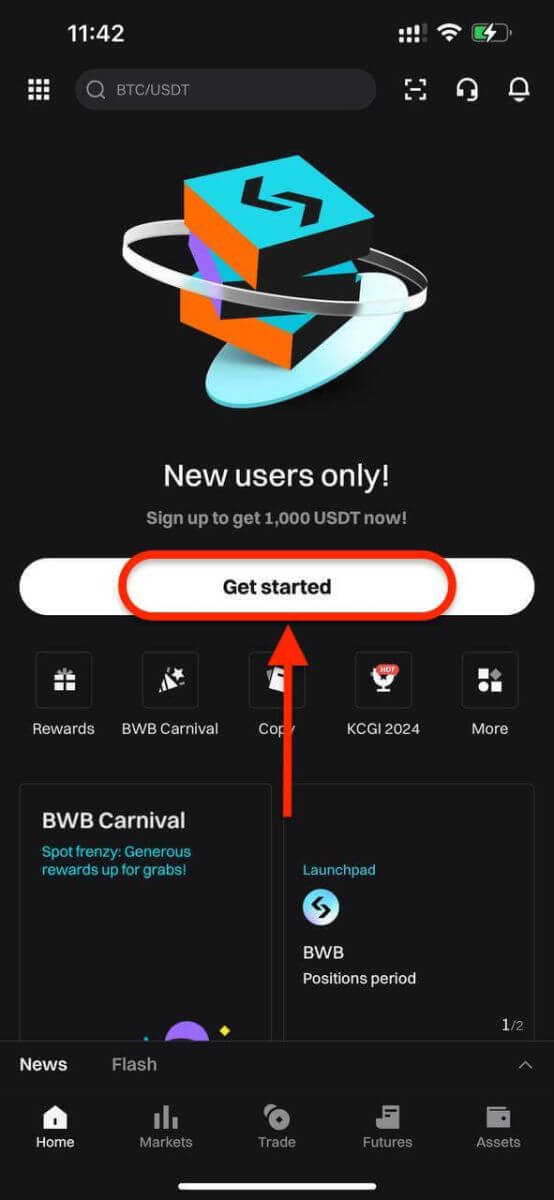
Step 3: Then, tap [Get started].
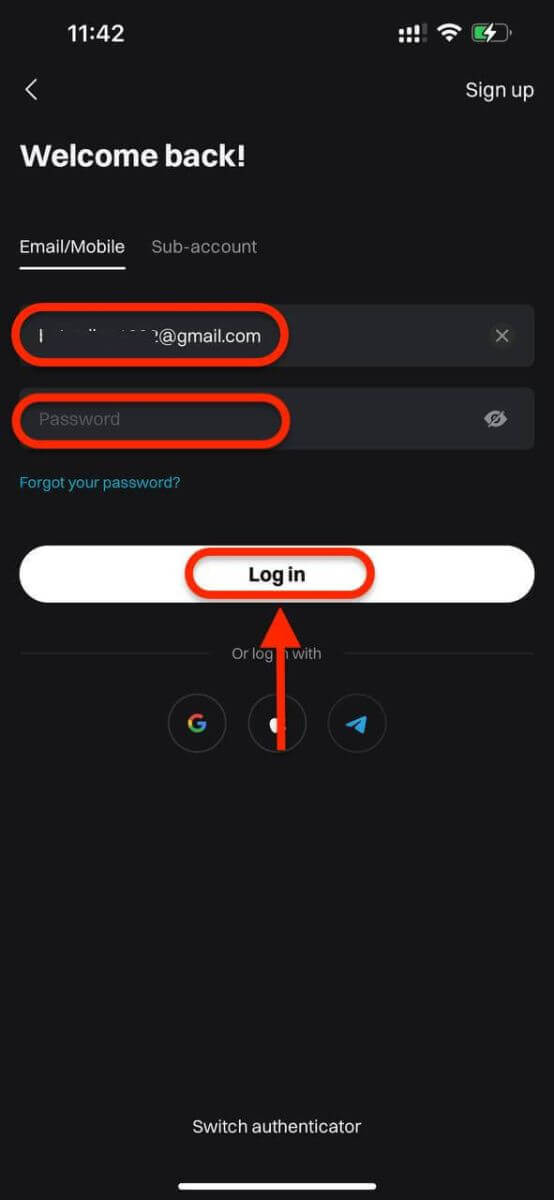
Step 4: Enter your mobile number or email address based on your selection. Then enter your account password.
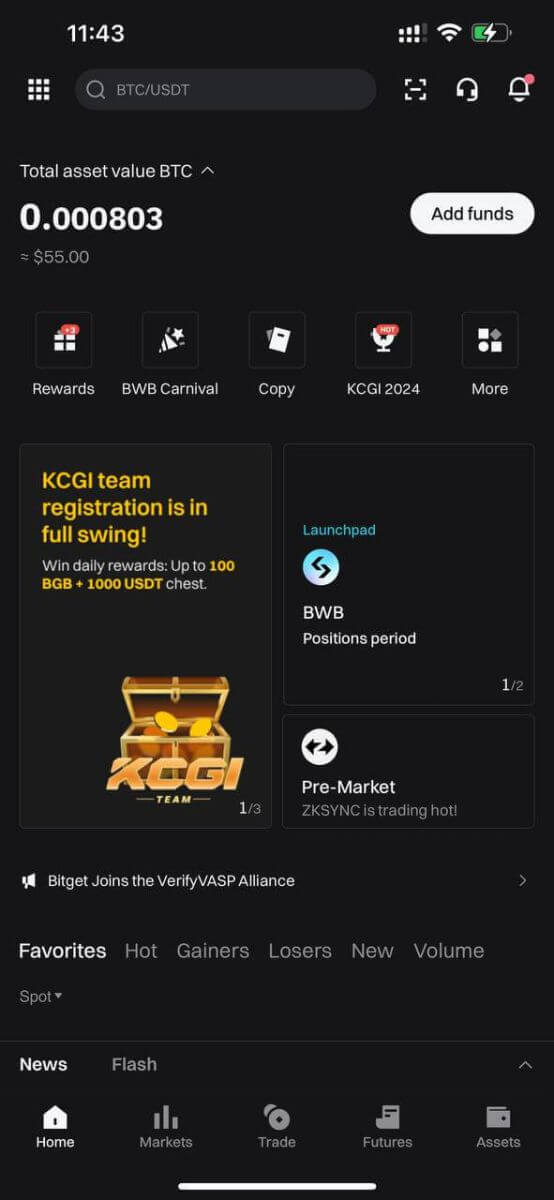
Step 5: That’s it! You have successfully logged in to the Bitget app.
Two-Factor Authentication (2FA) on Bitget Sign in
Bitget prioritizes security as a top focus. Utilizing Google Authenticator, it adds an additional security layer to safeguard your account and prevent potential asset theft. This article provides a guide on binding Google 2-Step Verification (2FA).
Why use Google 2FA
Google Authenticator, an app by Google, implements two-step verification through time-based one-time passwords. It generates a 6-digit dynamic code that refreshes every 30 seconds, each code usable only once. Once linked, you’ll need this dynamic code for activities like login, withdrawals, API creation, and more.
How to Bind Google 2FA
The Google Authenticator app can be downloaded from the Google Play Store and Apple App Store. Go to the store and search for Google Authenticator to find and download it.If you already have the app, let’s check out how to bind it to your Bitget account.
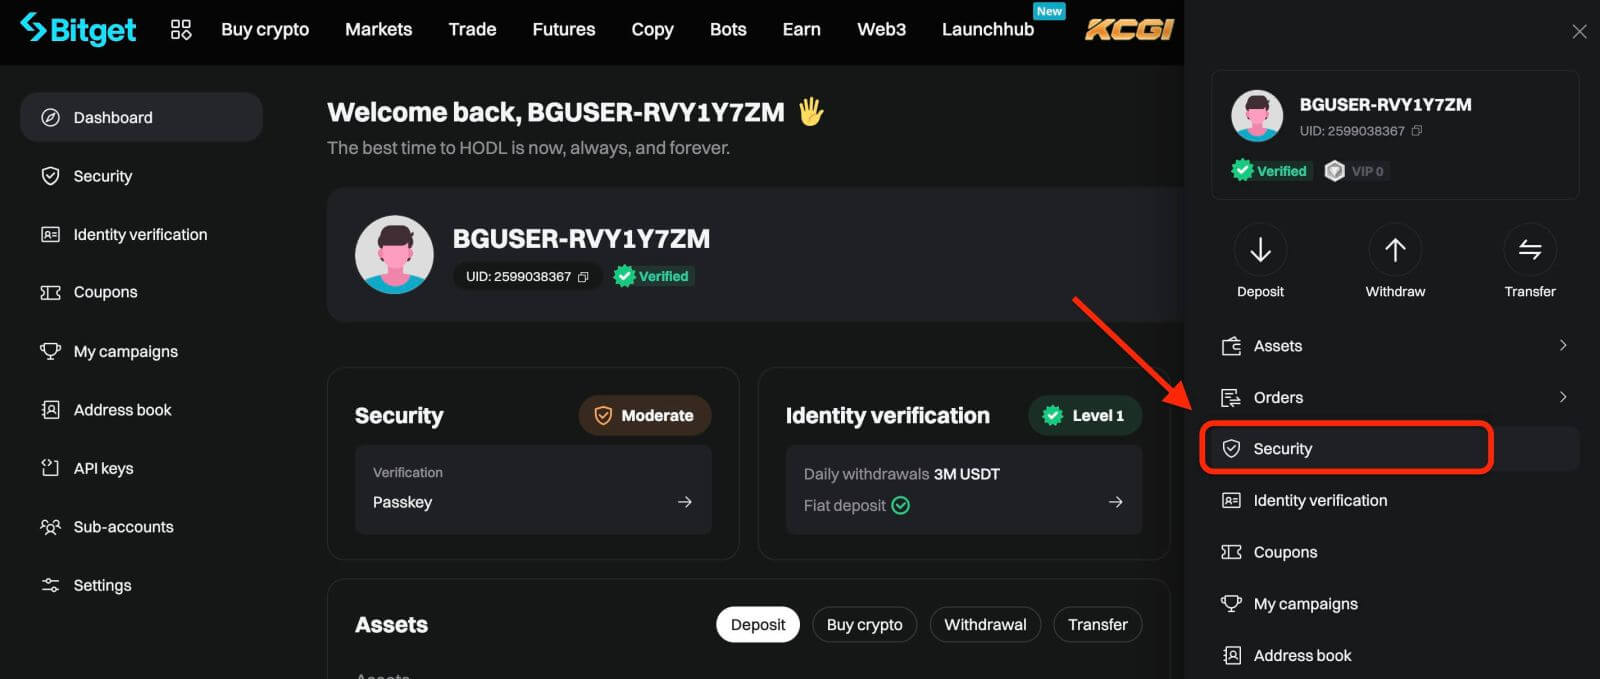
Step 1: Log in to your Bitget account. Click the avatar on the upper-right corner and select Security in the drop-down menu.
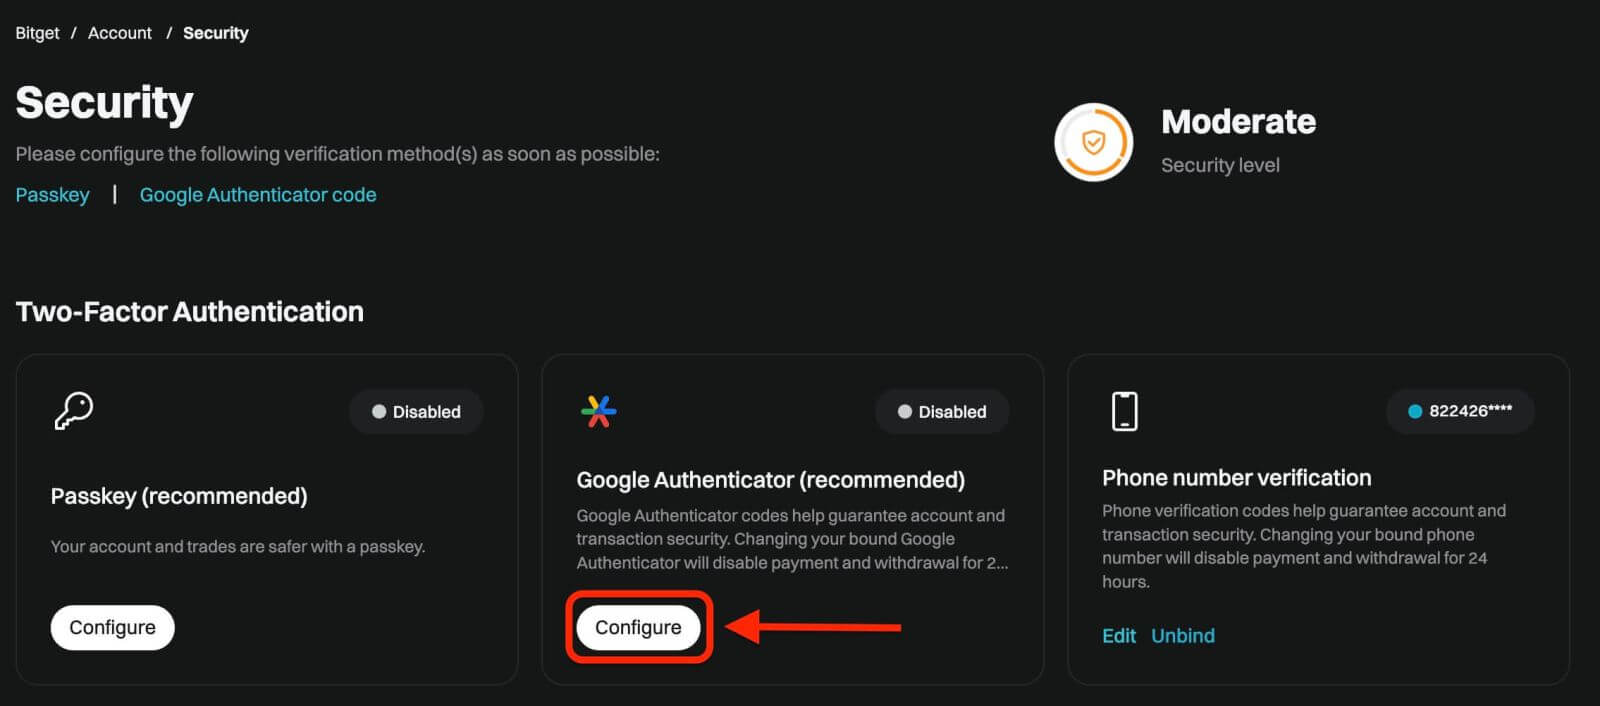
Step 2: Find Security Settings, and click "Configure" of Google Authenticator.
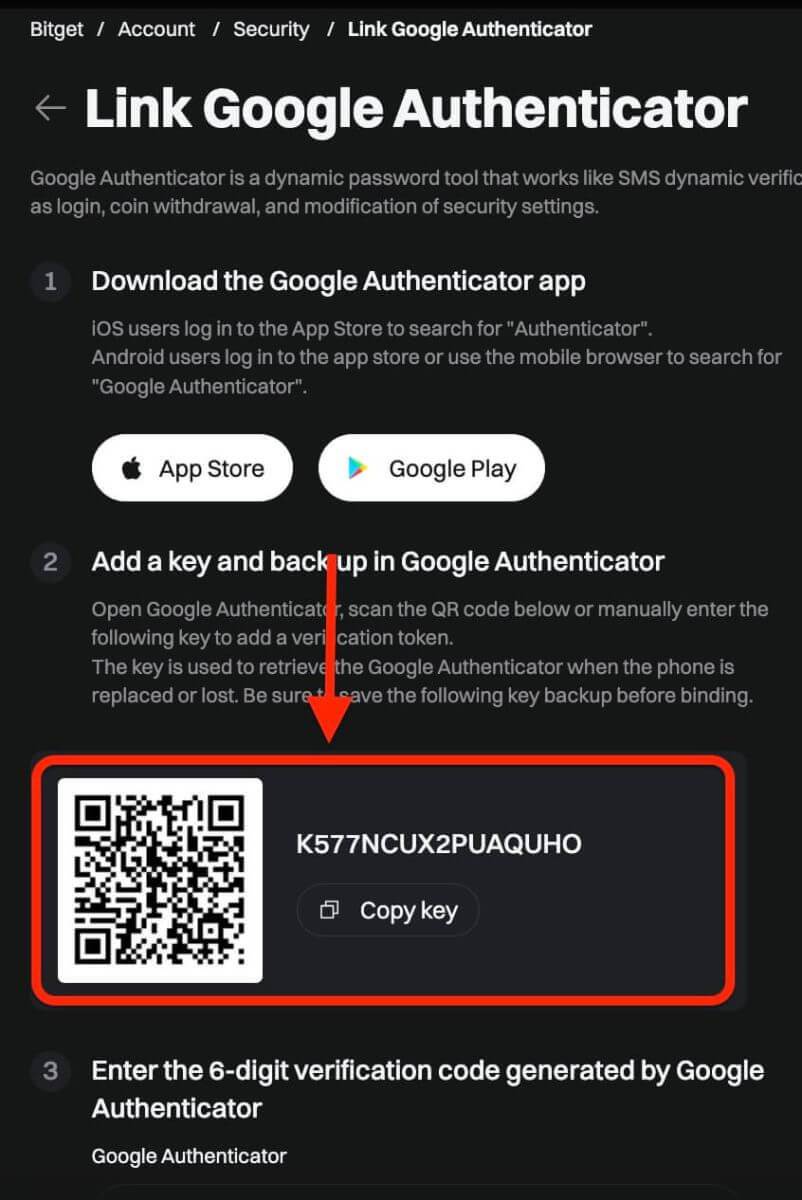
Step 3: Next, you will see a page below. Please record the Google Secret Key and store it in a secure place. You will need it to restore your Google 2FA if you lose your phone or accidentally delete the Google Authenticator app.
Step 4: Once you have saved the Secret Key, open the Google Authenticator app on your phone
1) Click the "+" icon to add a new code. Click on Scan barcode to open your camera and scan the code. It will set up the Google Authenticator for Bitget and start generating the 6-digit code.
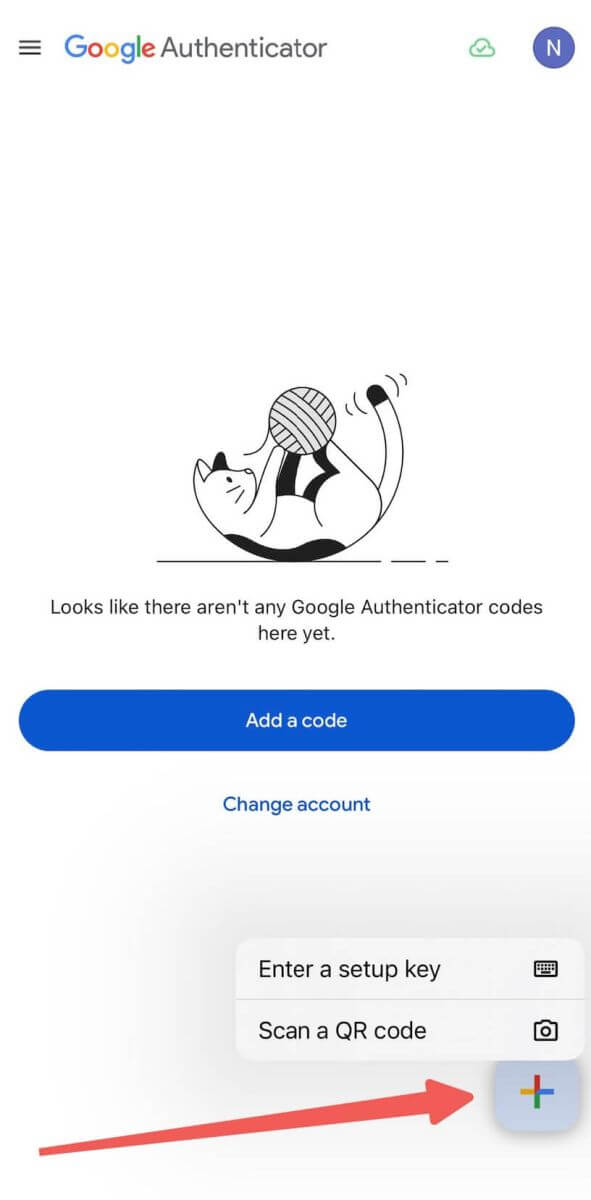
2) Scan the QR code or manually enter the following key to add a verification token.
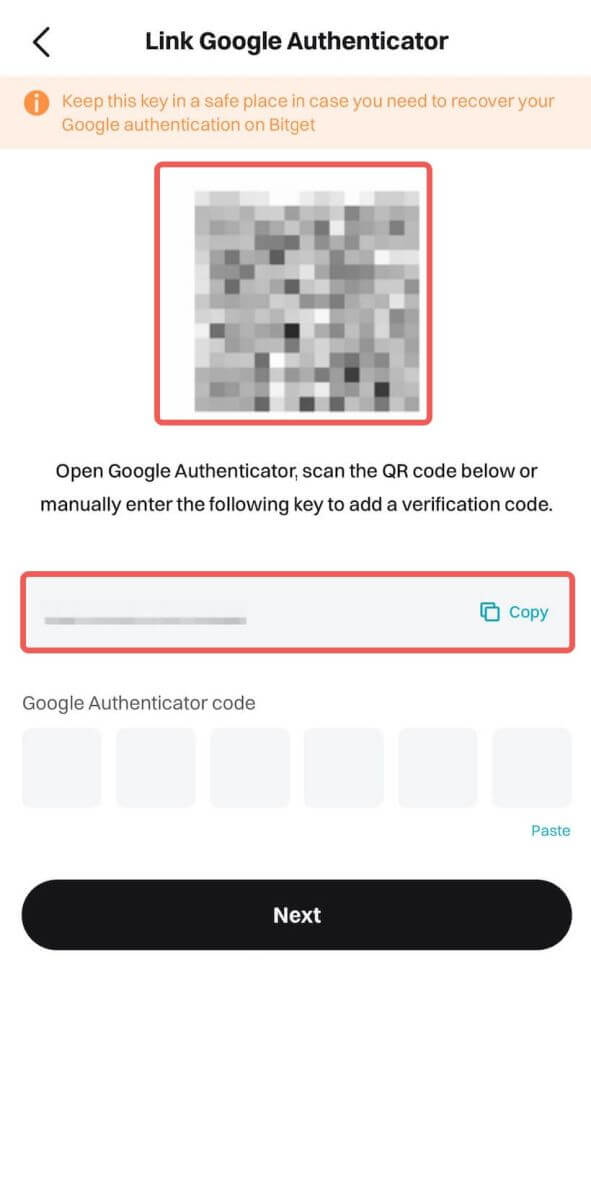
Note: If both your Bitget APP and GA app are on the same phone device, it is difficult to scan QR code. Therefore, it is best to copy and enter the setup key manually.
Step 5: Lastly, copy and enter the new 6-digit verification code in Google Authenticator.
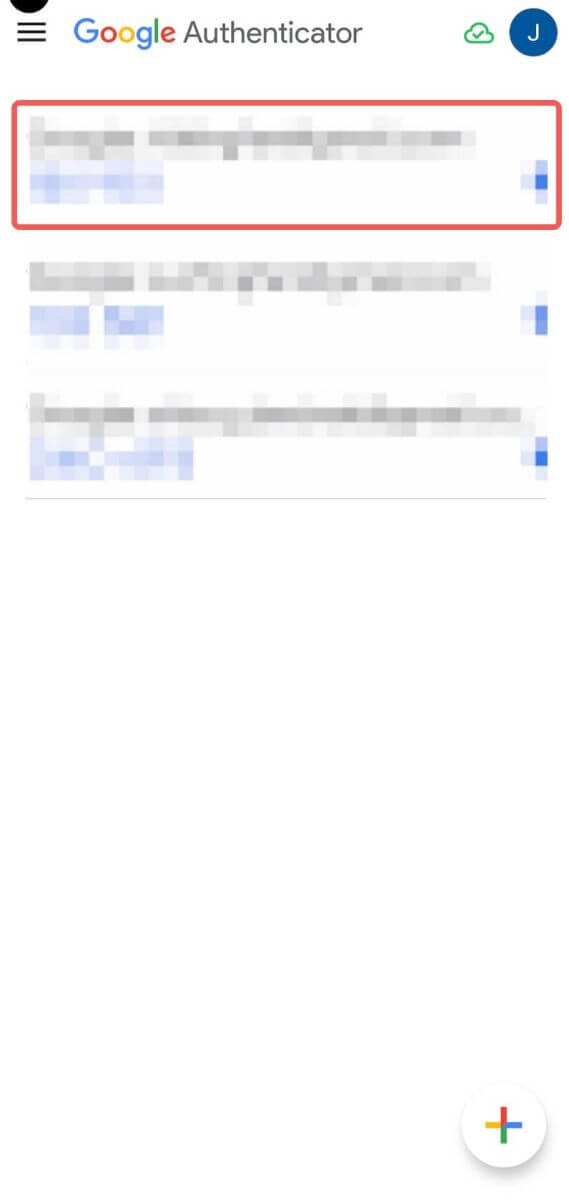
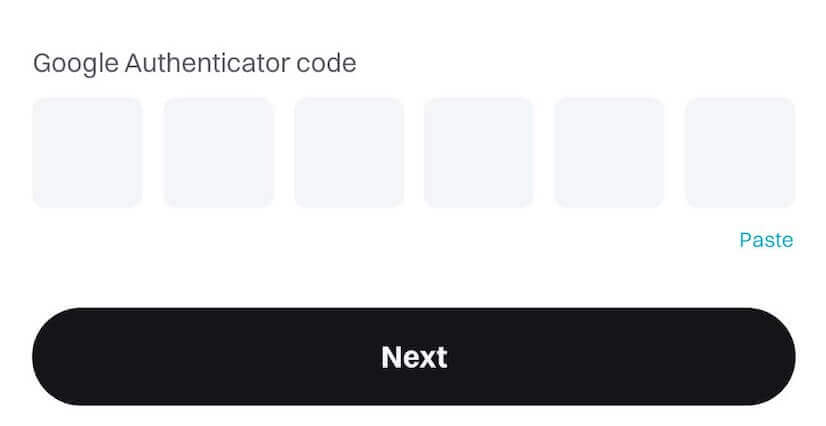
And now, you have successfully linked Google Authentication (GA) to your Bitget account.
- Users must input the verification code for login, trading, and withdrawal processes.
- Avoid removing Google Authenticator from your phone.
- Ensure the accurate entry of the Google 2-step verification code. After five consecutive incorrect attempts, Google 2-step verification will be locked for 2 hours.
How to Reset Bitget Password
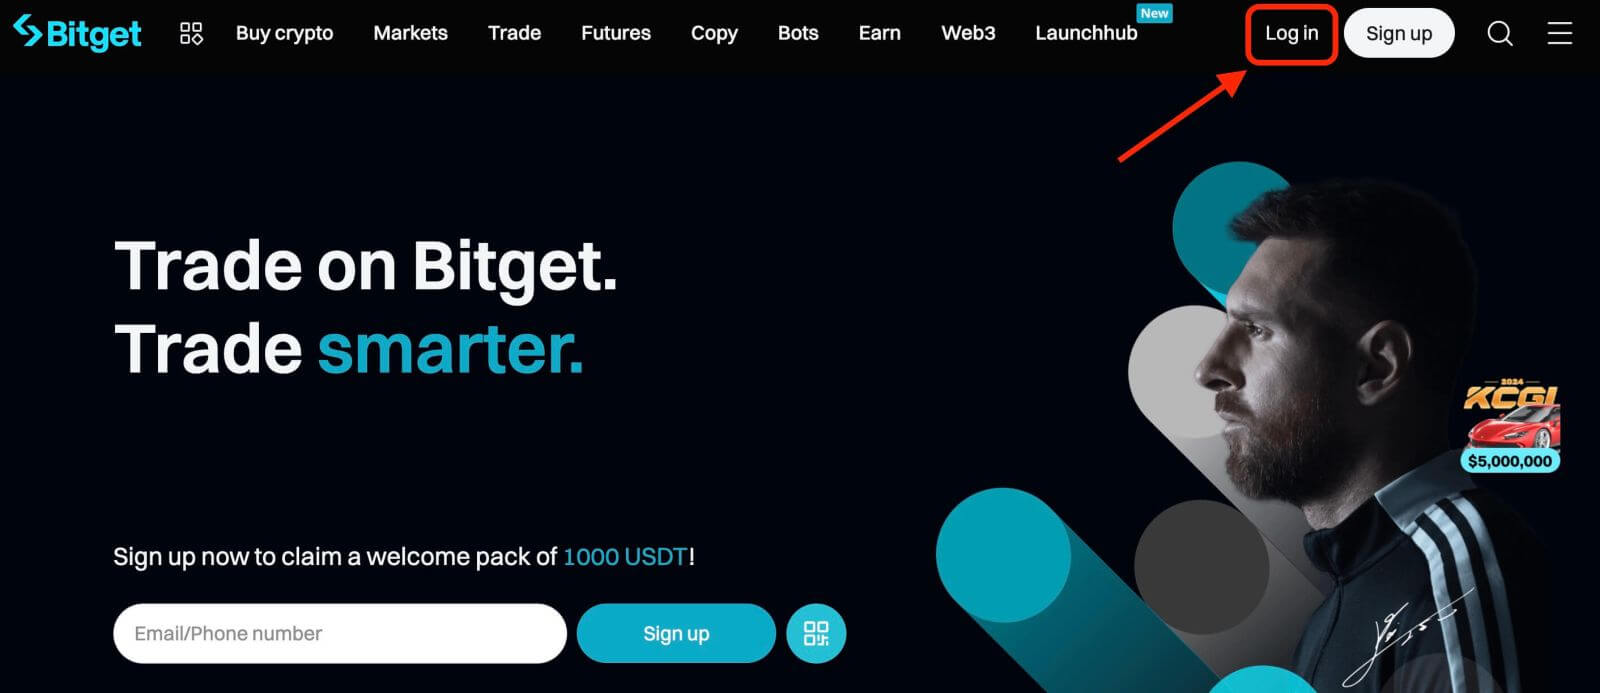
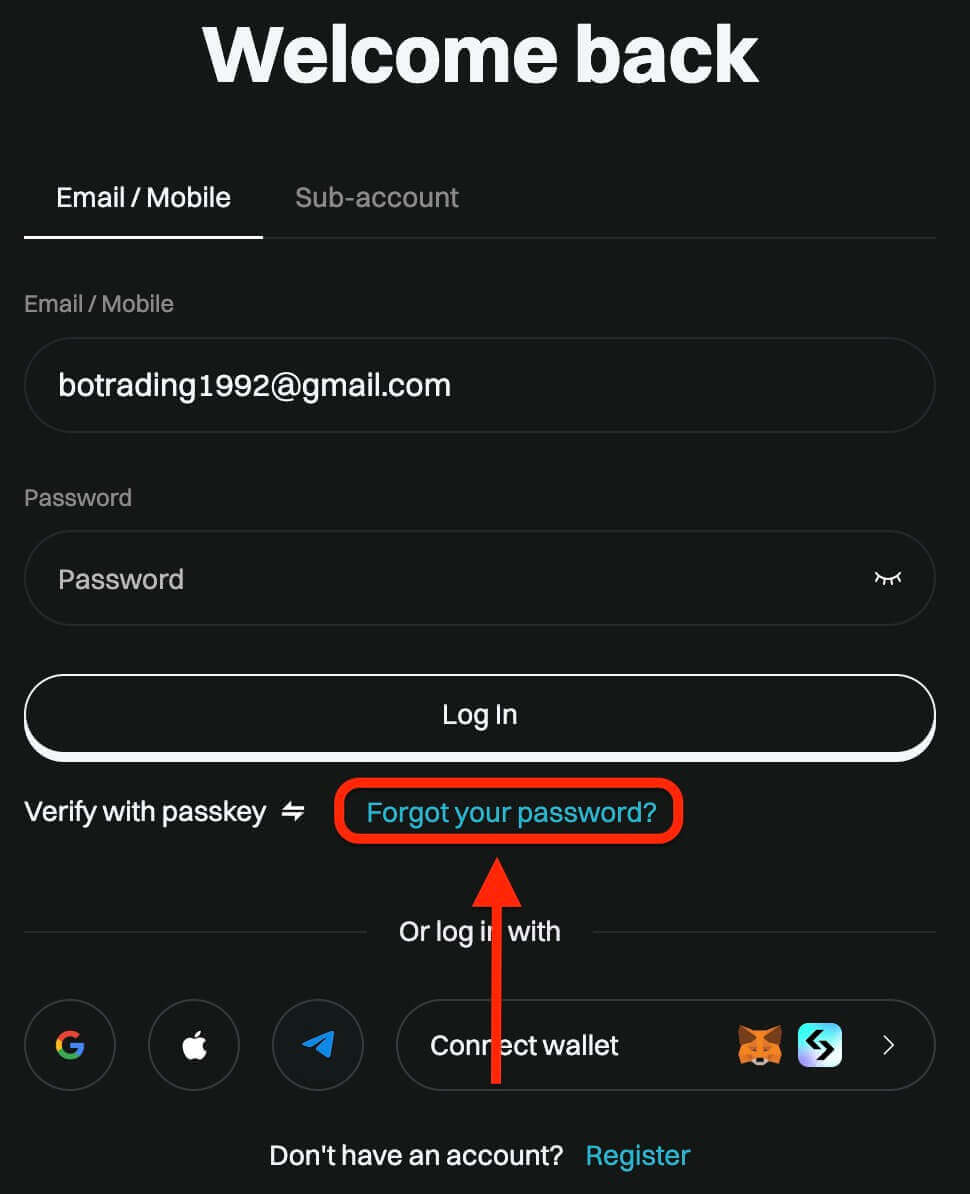
If you’ve forgotten your Bitget password or need to reset it for any reason, don’t worry. You can easily reset it by following these simple steps:Step 1. Go to the Bitget website and click on the "Log in" button, typically found in the upper right-hand corner of the page.
Step 2. On the login page, click on the "Forgot your password?" link below the Log In button.
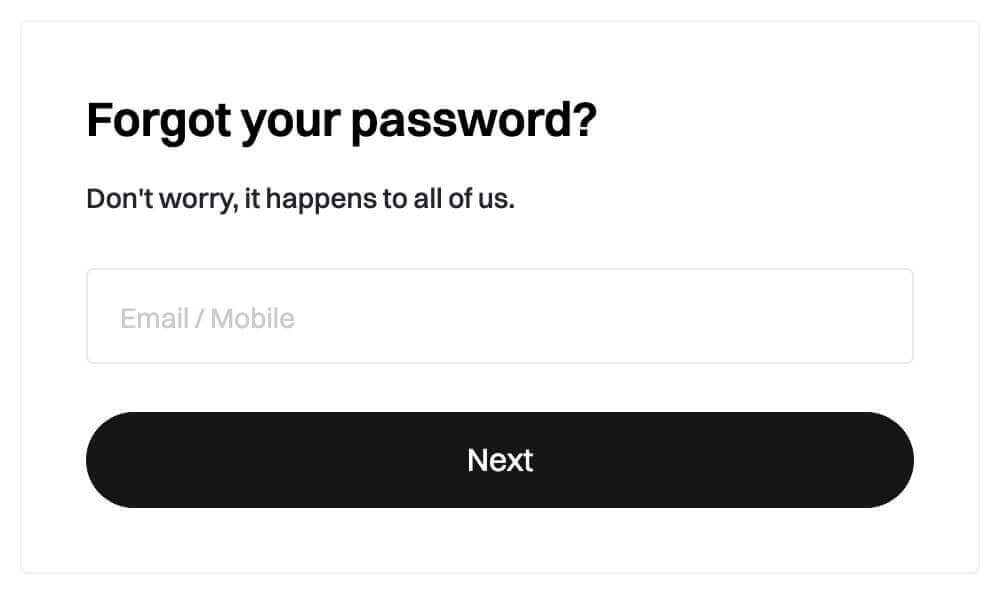
Step 3. Enter the email address or phone number that you used to register your account and click on the "Next" button.
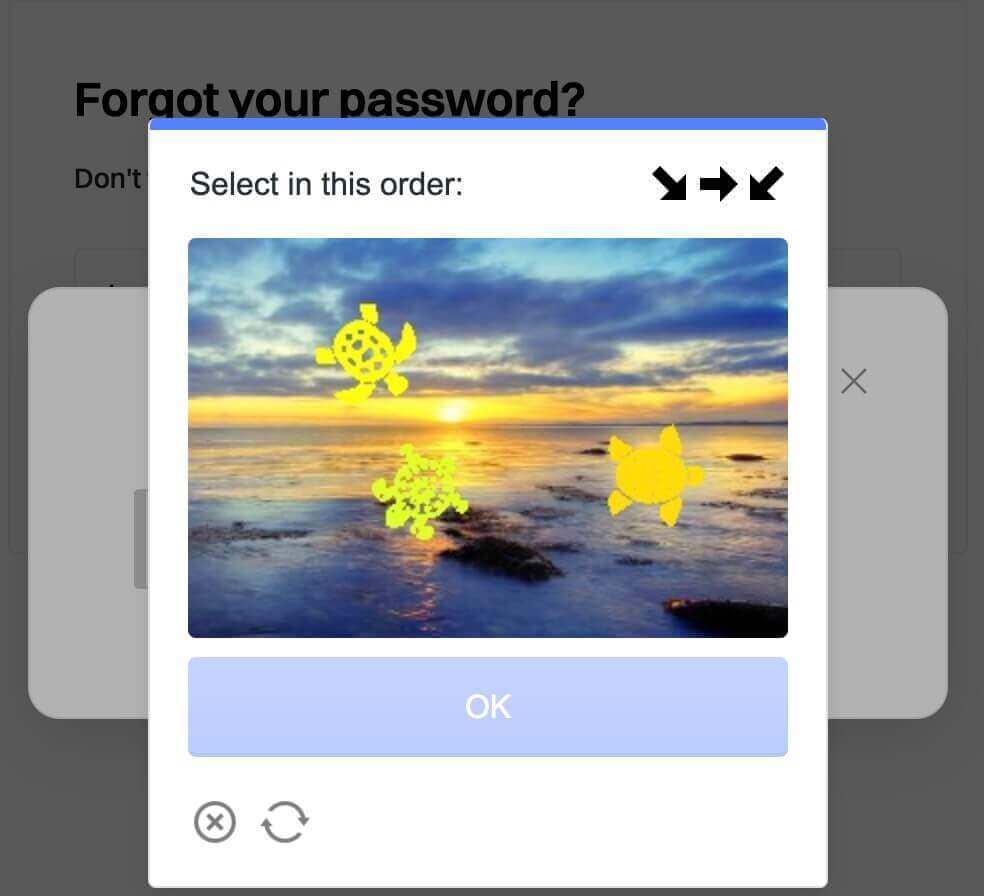
Step 4. As a security measure, Bitget may ask you to complete a puzzle to verify that you are not a bot. Follow the instructions provided to complete this step.
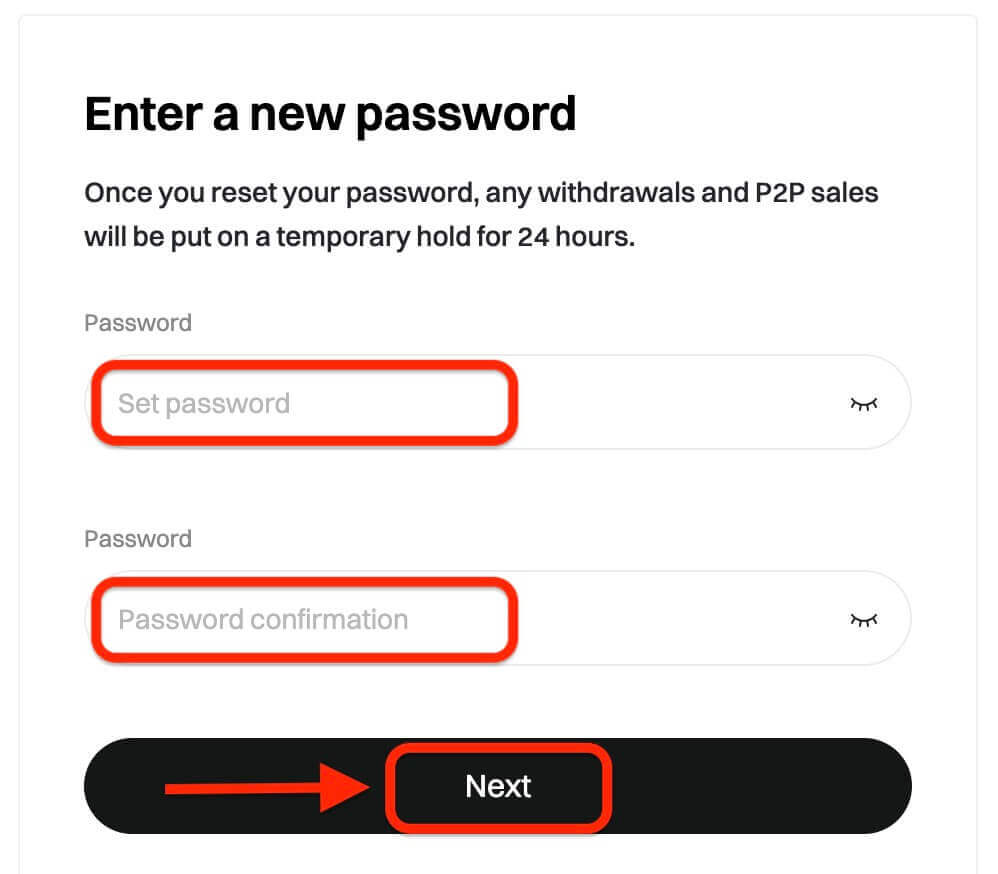
Step 5. Enter your new password a second time to confirm it. Double-check to ensure both entries match.
Step 6. You can now log in to your account with your new password and enjoy trading with Bitget.
How to Withdraw from Bitget
How to Sell Crypto on Bitget using P2P Trading
WebIf you’re looking to sell cryptocurrency on Bitget through P2P trading, we’ve put together a detailed step-by-step guide to help you get started as a seller.
Step 1: Log in to your Bitget account and navigate to [Buy Crypto] [P2P Trading (0 Fees)].

Before trading on the P2P market, ensure you have completed all verifications and added your preferred payment method.
Step 2: In the P2P market, select the cryptocurrency you want to sell from any preferred merchant. You can filter P2P advertisements by coin type, fiat type, or payment methods to find buyers that meet your requirements.

Step 3: Enter the amount of cryptocurrency you want to sell, and the system will automatically calculate the fiat amount based on the buyer’s price. Then, click [Sell].

Add payment methods according to the buyer’s preference. A fund code is required if it is a new setup.
Step 4: Click [Sell], and a security verification pop-up screen will appear. Enter your fund code and click [Confirm] to complete the transaction.
Step 5: Upon confirmation, you will be redirected to a page with the transaction details and the amount the buyer is paying. The buyer should transfer the funds to you via your preferred payment method within the time limit. You may use the [P2P Chat Box] function on the right to contact the buyer.

After the payment is confirmed, click the [Confirm The Payment And Send The Coins] button to release the cryptocurrency to the buyer.

Important Note: Always confirm that you have received the buyer’s payment in your bank account or wallet before clicking [Release Crypto]. DO NOT release crypto to the buyer if you haven’t received their payment.
App
You can sell your cryptocurrency on the Bitget app via P2P trading with the following steps:
Step 1: Log in to your Bitget account in the mobile app and tap on [Add Funds] in the Home section. Next, click on [P2P Trading].


Before trading on the P2P market, make sure you have completed all verifications and added your preferred payment method.
Step 2: In the P2P market, select the cryptocurrency you want to sell from any preferred merchant. You can filter P2P advertisements by coin type, fiat type, or payment methods to find buyers that meet your requirements. Enter the amount of cryptocurrency you want to sell, and the system will automatically calculate the fiat amount based on the buyer’s price. Then, click [Sell].


Step 3: Add payment methods according to the buyer’s preference. A fund code is required if it is a new setup.
Step 4: Click on [Sell], and you will see a pop-up screen for security verification. Enter your fund code and click [Confirm] to complete the transaction.
Upon confirmation, you will be redirected to a page with transaction details and the amount the buyer is paying. You will see the buyer’s details. The buyer should transfer the funds to you via your preferred payment method within the time limit. You may use the [P2P Chat Box] function on the right to contact the buyer.

Step 5: After the payment is confirmed, you can click the [Release] or [Confirm] button to release the cryptocurrency to the buyer. A fund code is required before releasing the cryptocurrency. Important
Note: As a seller, please ensure you receive your payment before releasing your cryptocurrency.

Step 6: To review your [Transaction History], click the [View Assets] button on the transaction page. Alternatively, you can view your [Transaction History] in the [Assets] section under [Funds], and click the icon on the top right to view [Transaction History].

How to Withdraw Fiat Balance from Bitget using Bank Transfer
Web
Here’s a comprehensive manual for effortlessly withdrawing USD on Bitget through bank deposit. By adhering to these straightforward steps, you can securely fund your account and facilitate seamless cryptocurrency trading. Let’s dive in!
Step 1: Head to the Buy crypto section, then hover over the Pay with option to access the fiat currency menu. Opt for USD and proceed to Bank deposit Fiat withdraw.

Step 2: Choose an existing bank account or add a new one for receiving the withdrawal amount.

Note: A PDF bank statement or a screenshot of your bank account is mandatory, displaying your bank name, account number, and transactions from the past 3 months.

Step 3: Input the desired USDT withdrawal amount, which will be converted to USD at a floating rate.

Step 4: Verify the withdrawal details.

Step 5: Expect the funds to arrive within 1-3 working days. Monitor your bank account for updates.

App
Guide to Withdrawing EUR on Bitget Mobile App:
Discover the simple steps to withdraw EUR through bank transfer on the Bitget mobile app.
Step 1: Navigate to [Home], then select [Add Funds], and proceed to choose [Bank Deposit].

Step 2: Opt for EUR as your fiat currency and select [SEPA] transfer as the current method.

Step 3: Input the desired EUR withdrawal amount. Select the designated bank account for withdrawal or add a new bank account if necessary, ensuring all details align with your SEPA account.
Step 4: Double-check the withdrawal amount and bank details before confirming by clicking [Confirmed].
Step 5: Complete the security verification (email/mobile/Google authentication verification or all). You’ll receive a notification and email upon successful withdrawal.
Step 6: To monitor the status of your fiat withdrawal, tap the clock icon located at the top right corner.

FAQ regarding EUR withdrawal via SEPA
1. How long does a withdrawal through SEPA take?
Arrival time: within 2 working days
*If your bank supports SEPA instant, arrival time is nearly immediate.
2. What is the transaction fee for EUR fiat withdrawal via SEPA?
*Fee: 0.5 EUR
3. What is the daily transaction amount limit?
*Daily limit: 54250 USD
4. What is the transaction amount range per order?
*Per transaction: 16 USD ~ 54250 USD
How to Withdraw Crypto from Bitget
Web
Step 1: Log into Your Bitget Account
To start the withdrawal process, you need to log into your Bitget account.
Step 2: Access the Withdrawal Page
Navigate to the "Assets" located in the top right-hand corner of the homepage. From the drop-down list, select "Withdraw".
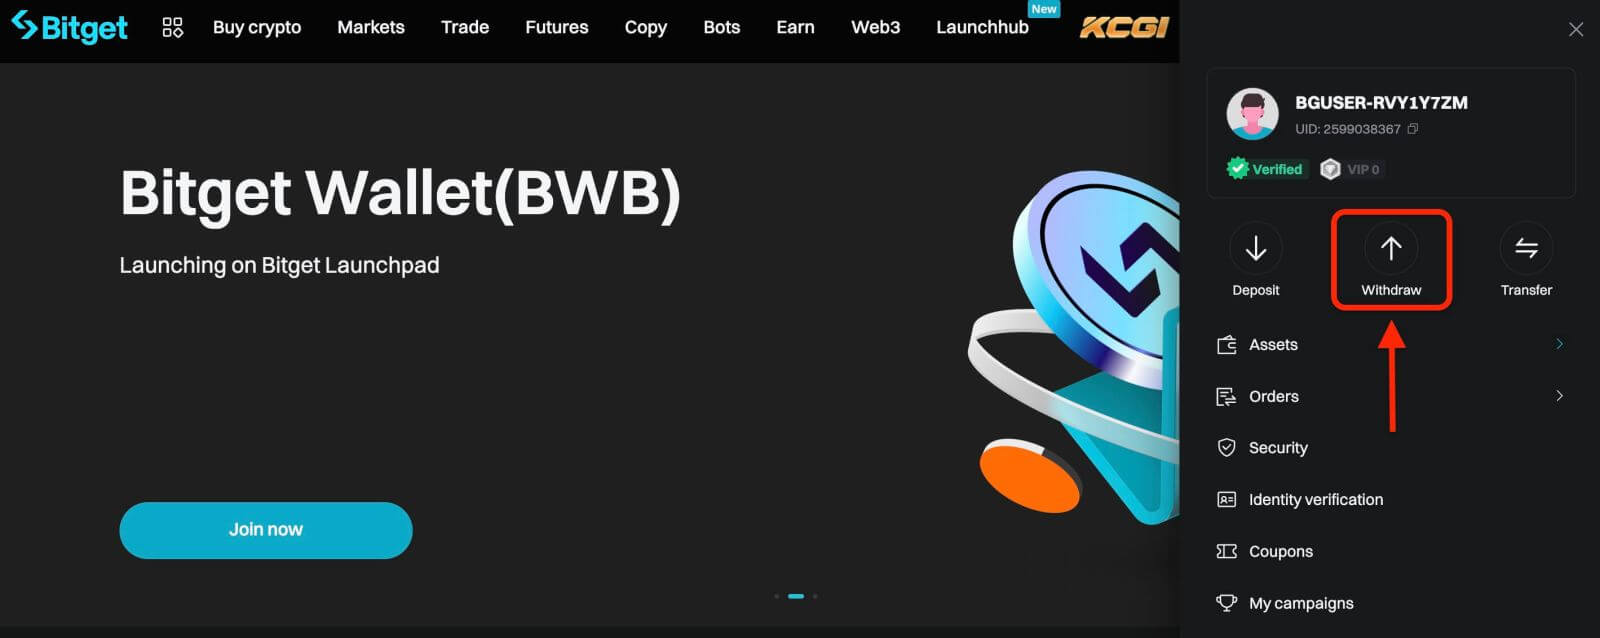
Next, proceed according to the following steps:
- Select a coin
- Select the network
- Input the address of your external wallet
- Enter the amount of cryptocurrency you wish to withdraw.
- Click on the "Withdraw" button.
Carefully review all the information you’ve entered, including the withdrawal address and the amount. Make sure everything is accurate and double-checked. Once you are confident that all details are correct, proceed to confirm the withdrawal.
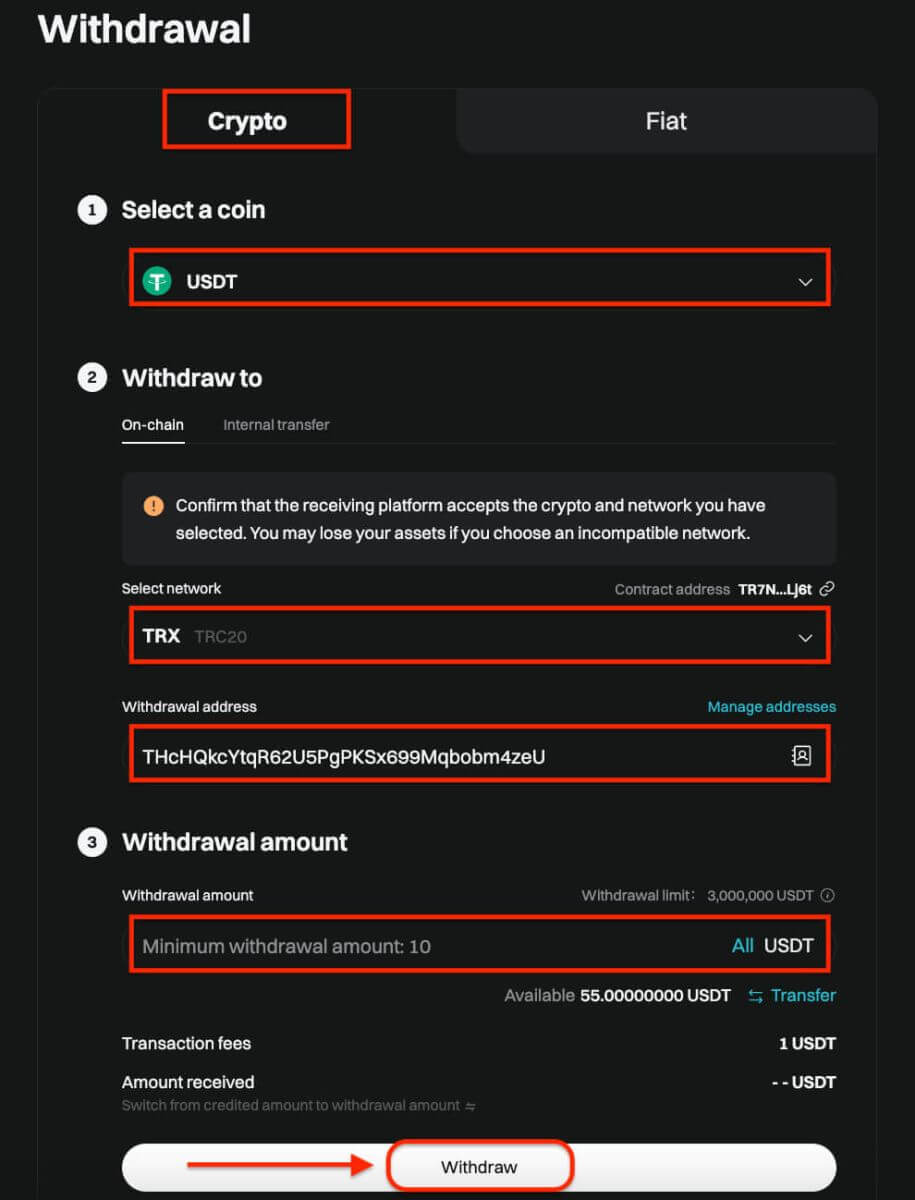
After you click on the withdraw button, you’ll be directed to the withdrawal verification page. The following two verification steps are required:
- Email verification code: an email containing your email verification code will be sent to the registered email address of the account. Please enter the verification code you’ve received.
- Google Authenticator code: Please enter the six (6)-digit Google Authenticator 2FA security code you’ve obtained.
App
Here’s a guide on how to withdraw crypto from your Bitget account:
Step 1: Access Assets
- Open the Bitget app and sign in.
- Navigate to the Assets option located at the bottom right of the main menu.
- Choose Withdraw from the list of options presented.
- Select the cryptocurrency you intend to withdraw, such as USDT.
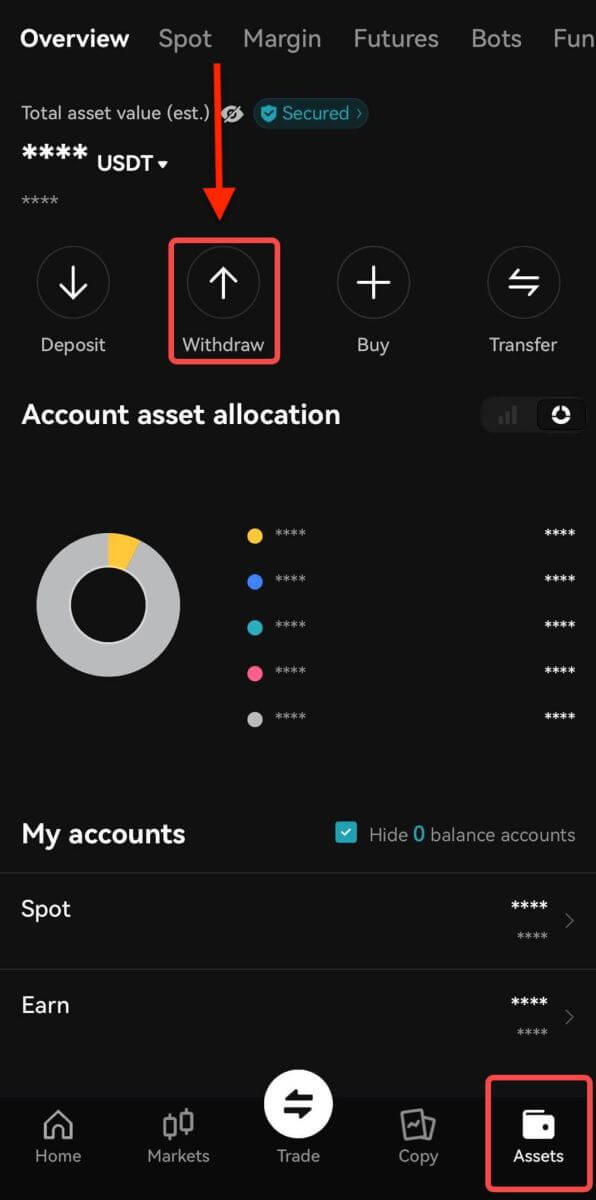
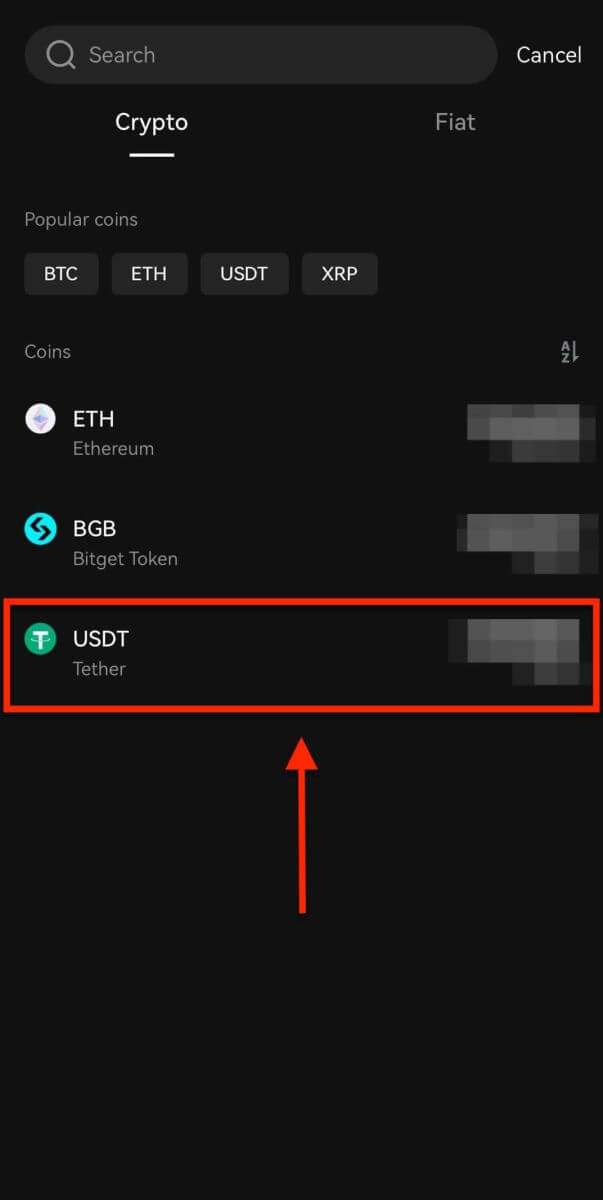
Note: If you plan to withdraw funds from your futures account, you must first transfer them to your spot account. This transfer can be executed by selecting the Transfer option within this section.
Step 2: Specify Withdrawal Details
-
On-chain Withdrawal

-
Opt for On-Chain Withdrawal for external wallet withdrawals.
-
Network: Select the appropriate blockchain for your transaction.
-
Withdrawal Address: Input the address of your external wallet or choose from saved addresses.
-
Amount: Indicate the withdrawal amount.
-
Use the Withdraw button to proceed.
-
Upon completing the withdrawal, access your withdrawal history via the Order icon.

Important: Ensure the receiving address matches the network. For example, when withdrawing USDT via TRC-20, the receiving address should be TRC-20 specific to avoid irreversible loss of funds.
Verification Process: For security purposes, verify your request through:
• Email code
• SMS code
• Google Authenticator code
Processing Times: External transfers’ duration varies based on the network and its current load, usually ranging from 30 minutes to an hour. However, expect potential delays during peak traffic times.


